Using the theme
To use the theme extract the main downloaded zip file.
After extracting you will find a folder named similar to theme name. That folder is the production ready ( live site ready ) theme.
To set up the theme properly with several setting options, please read through the documentation.
Please edit theme files using a proper code editor. There are lots of free and opensource code editor available. You can choose any of those, some popular free code editor Visual Studio Code , Atom
Installation
WordPress theme can be installed in 2 ways.
- Through wordPress admin dashboard.
- Uploading via FTP.
Through WordPress
Installing a theme through WordPress is very easy. Login to your WordPress Dashboard and be ready to go. Now you have to follow few steps described below.
- In WordPress Admin panel's sidebar navigation go to Appearance > Themes. Now click on "Add New" button at the top.
- In the main download zip you will find a zip named "summit.zip".
- Now click on "Upload Theme" and after That click "Choose File" and locate your Theme zip file(summit.zip). Then install now.
- Within few seconds you will see a message "Theme installed successfully."
- Now click on "Activate".
Your new theme will be installed and activated successfully. Now you will see an notification above the page. It will ask you to install some plugins which are required for this theme.
Please install those plugin. Some plugin comes with this theme and some installs from wordpress.org Plugin Directory and it's free.
Uploading via FTP
In your themeforest download folder you will find a folder "summit" you have to upload this folder in your web host. Follow the instruction below.
- Connect your webserver via ftp and find the folder wp-content > themes in your WordPress installation. This folder contains all your installed themes.
- Transfer / upload the "summit" folder in that "themes" folder.
- After successful upload, login to your WordPress dashboard and go to Appearance > Themes. You will see the Summit theme listed here.
- Hover over the theme thumbnail and click on the "Activate" button. Your new theme will be activated successfully. Now you will see an notification above the page. It will ask you to install some plugins which are required for this theme.
Please install those plugin. Some plugin comes with this theme and some installs from wordpress.org Plugin Directory and it's free.
You must should install and activate all those required plugin before you write any post or page or anything else. Without this plugin the theme will not work properly.
Home page
For this theme's custom home page at first you have to create 2 page and make some settings.
Go to Pages > Add New and create a page. Choose "Home Page" template for this page. This will be the home page.
Create another page with "Default Template". In both pages keep the content blank.
Now go to Settings > Reading in admin sidebar and check these option "Front page display" > "A static page (select below)". In the dropdown options, for home page choose the page you have just created with "Home Page" template. For blog page choose that another page which you have created with "Default Template". Then save the settings.
Now you have done the page setup successfully.
At this Point you you will not see any sections in the home page. So you have to create sections and add those in the homepage. We will discuss that process later. Before That you have to get google map API key for your website, otherwise Google map will not work. ( It's google new policy that an API key is required to use Google map on website.
Please Read Theme Option Configurations section To know, how to get an API key and setup in your theme.
Theme option configuration
For simplicity Daily News theme uses WordPress's default customization option and most of the options are self explanatory. Go to Appearance > Customize to see the available customization options.
Site Identity
In this section you will see Your site title and tagline which you have set up at the time of WordPress installation. If you want to change these you can do that. Also you can add site icon here.
General Settings
In this section you will find some general settings which will be used in entire site.
- Upload Logo: Add Image logo here.
- Hide preloader: Check this box to disable preloader ( loading screen ).
- Google Map API key: You have to generate an API key. Please visit https://developers.google.com/maps/documentation/javascript/get-api-key
- Then click on "GET A KEY". Then follow The instruction there and create an API key there. After Creating the API key, copy that and paste it in this field of theme settings.
Colors
Here you can change the theme primary color.
Keep "Header Text Color" and "background color" as it is. Change other color if you want.
Navigation Settings
- Navigation Bar Type: Normal for Normal scroll with the page. Fixed for Fixed nav bar, means the navigation bar will fixed at top when you scroll the page.
- Enable Single Page Mode: Enable it if you set up the theme as a single page website. It will enable the smooth scroll between sections in home page. Also You have to setup the menu correctly to work it correctly. We will discuss the menu setup process later.
Post Style Settings
- Show Full Post in post listing: Enable this to show the entire post instead of post excerpt. in the post listing.
- Hide about author: Enable this to hide the author info box below single post.
Speaker Settings
- Speaker Archive Column Count: Choose 3 or 4 column layout for speaker archive page.
- Single Speaker Page Layout: Choose Single speaker page to be horizontal or vertical.
Footer Settings
- Hide Footer Widget Area: Check this to hide the footer widget area.
- Custom Copyright text: Add custom copyright text to override the default copyright text.
Social Icon Settings
- Hide social icon in footer: Check this to hide the social icon area in footer.
- URL for different icons: Add your social media links in correct box, leave those box blank which icon you don't want to show.
Navigation
This section is also comes with WordPress by default. In this section you can choose which menu (created in dashboard) will be shown in main menu area.
It is recommended that to setup menu, you don't need use this section. you can do this from Appearance > Menus. It is the more easy way. Later in this documentation I will write, how to use Menus
Widgets
This section also generated by WordPress by default. It's a way to quick add / remove / modification of widgets in your site widgetize area. It is the same as Appearance > Widgets option in admin panel left sidebar.
Static Front Page
Normally You don't need to change anything here. It is same as Home page settings.
Custom Code
In this section you can quickly add custom CSS code to insert in your site.
If you want to add lots of css code, I will recommend you yo use a child theme.
A ready to use child theme for this theme is included in main download. Do not remove any file and code from it. Add your css in the style.css file.
Speaker and schedule
Add Speaker
Go to Speaker > Add New in your dashboard and then add a Speaker. Use a square image for speaker image for better result.
Add Schedule
Go to Schedules > Add New in your dashboard and then add a schedule.
In a schedule you can add multiple sessions. Each schedule will be shown as a tab and each session in a schedule will be shown as row.
Until you create schedules you can create a schedule section but can not add any schedule to show in that section. If you have created a schedule section before creating schedule itself, then you can create schedule and then edit the previously created schedule section. There you can add the schedule you have created.
How to create a section and add that to home page.
You can create sections for adding in home page or another page.
Create a section
To crate a section got to Sections > Add New within your admin dashboard. It will open a editor page similar to page or post editor.
There you will see a box Section type box at the right column. Choose which type of section you want to create.
In main editor are some options are common for each type of section. Below That box, you will see another set of option in a box which are specific to section type.
You have to fill the options, Keep unchanged or blank which you don't need.
Now click on "publish" button at right column to publish the section.
Add the sections in home page
So you have created one or more section(s). now it's time to add those section in home page.
Go to "Pages" and then open the home page ( which you have created earlier ) to edit.
If you have created the home page correctly then you will see a box "Page Section Setting" box below the editor box.
There is a box "Section 1" within that box. Choose a section in the drop down option there.
To add another section in home page click on "Add Another Section" button. and repeat the above instruction.
Now Update the page in right column. Now visit your website home page. If you have done all the steps correctly, you should see the section(s) in home page.
Please note few option in "Section general settings" option box are not required for all section.
Example: title and description not required for "Banner" type section ( this section shows the count down timer ).
Section Id is must required for single page setup. You have to use same id in the menu items for single page menu scrolling. You can leave it blank if you are creating a multi-page website.
You can keep the background image field blank if you don't need to show a background image in that section.
####Add section in other Page
It is similar to adding section in home page. But You have to choose "Page with sections" template in place of "Home Page" at the right side column ( Page attribute box ).
Menu setup for single page site.
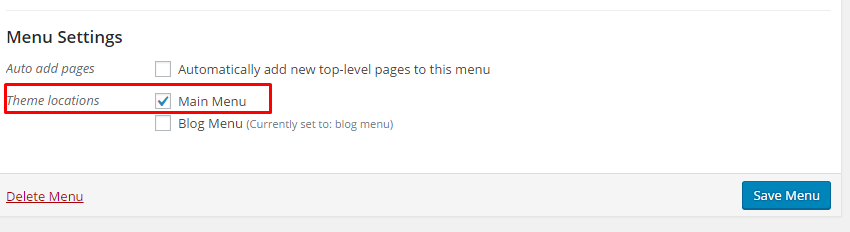
For single page website you have to create 2 menu. One is for home page another is for blog page.
Go to Appearance > menu and create a menu.
- Click on "Custom Links" option in left column.
- In URL field you have to add the section Id you want to link, with a
#at the beginning. Let's say you have created a section with id "example_id" then you have to add "#example_id" in the URL field. - Link text will be the text label what you want to show in the menu bar.
- now assign this menu to "Main menu" theme location.
Create another menu and assign that menu to "Blog Menu" theme location.

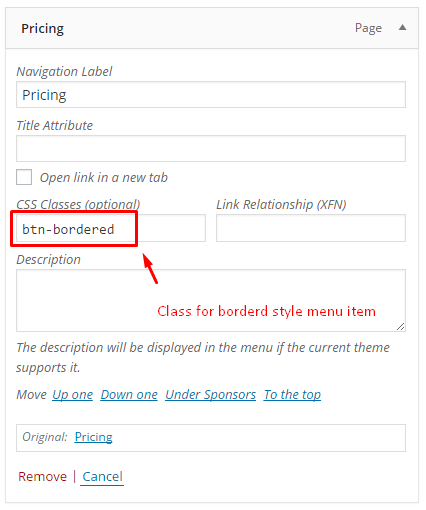
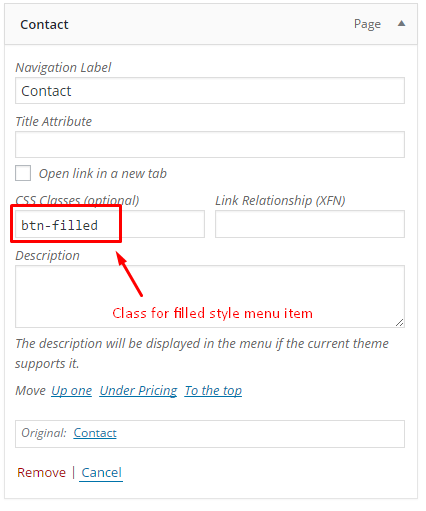
Menu bordered and filled
In menu bar, you can make a menu item bordered or filled style. To make a menu item bordered or filled style you have to add a class in that menu item.
for bordered menu item style you have to add class btn-bordered, and for filled style the class is btn-filled. Please check the screenshots below.
WordPress beginner Instruction
How to Create menu
To setup navigation for your WordPress at first you have to create a menu. To easily create It is recommended that you create your pages at first. No problem if you keep this page blank at this point.
Go to Appearance > Menus now give a name to your menu and add menu item (pages or custom links) to this menu and then save the menu.
Now click on Manage Locations. Here you will see a table with two column "Theme Location" and "Assigned Menu". Choose your recently created menu from the dropdown option for the menu location (In this theme it is called "Main Menu"). Now click on save changes.
How to add widgets in widgetize area
Go to Appearance > Widgets from the admin sidebar menu.
In this theme There is 5 widgetize area which are Main Sidebar and Footer Widget area one /two / three / four
Just drag available widgets from left side of this page into these widget area. and then insert necessary content and settings and save that widget.
Different Post Formats
To make a new post go to Posts > Add New from the admin sidebar. This theme support various post formats. Choose which format of post you are going to create. At the right side you can see "format option". You can choose here.
Depending on which format you choose there will be a meta box (options for that specific post format you choose) below the post content box.
This options are pretty much self explanatory. I highly recommend to use these options for different post format. It will ensure that your posts will be rendered in your site correctly.
Demo Installation
If you want to install the demo data as the Live demo site of this theme. follow the instruction below
Please note, If you import demo data maybe there will be some un-wanted data and / settings in your site. As well as maybe your previous settings will be removed totally or partially. Be sure, you want to do this.
Go to Tools > Import from your admin sidebar.
Click on WordPress. If you didn't used this option before then a popup will be opened showing "WordPress Importer". Click on "Install Now" button.
After successful installation click on "Activate Plugin & Run Importer".
Now click on "Choose file" button and locate "summit.singlepage.wordpress.demo.data.xml" or "summit.multipage.wordpress.demo.data.xml" file. It is located in folder "Demo Data" in your themeforest main download folder. Now click on "Upload file and import" button.
In next step check this option "Download and import file attachments" and click on "submit"
Maybe some error or warning will display but don't worry if you can see a success message then it's fine.
It is recommended that use this demo data import for test / understanding purpose only. Don't use these in your live site.
Contact Form
Go to Contact. Then open to edit the available form or create a new one.
For form code, Open "contact-form.txt" file located in "Demo Data" folder. Copy the code from that file and add it into the form code area in your dashboard ( replace the default code there ).
Now save the form. Use the form shortcode in contact section.
Mailchimp
Go to "Mailchimp for WP" option in your dashboard. At first set the API key there.
After That Go to "Mailchimp for WP > Forms".
Now open "mailchimp-form.txt" file located in "Demo Data" folder. Copy the code from that file and add it into the mailchimp form code area in your dashboard ( replace the default code there ).
Changelog
V 2.0.0 - May 22, 2019
- Transferred custom meta box for different post types, and other plugin territory functionality from theme to separate plugins as per the Themeforest latest requirement.
- Added Gutenberg's all default block support, and added editor style to match with the theme style
V 1.0.0 - September 15, 2016
- Initial release